Download
imgpreview.tar.gzRendering images to a terminal
I came accross this nifty twitter client called Rainbow Stream which has an option to render images to your terminal. I was curious how this was implemented so I ended up finding their source code, which referenced xterm256.c from Fabulous which is a python library for printing images, colors and text to the terminal. It seemed like a nice piece of functionality to have in the form of a command-line tool that can be called to preview images on your terminal. So I set out to replicate the image printing functionality as well as make an attempt to improve the image quality.How does it work?
You can change the foreground and background colors of the text on your terminal by using ANSI escape codes. In the case of a 256 color terminal you would want to use the following escape codes:\e[38;5;44m // Change the foreground color to color 44 \e[48;5;44m // Change the background color to color 44If you print these sequences to the terminal any text that follows will use the new colors, so once the entire image has been displayed it would be nice to reset the color back to its default value. This can be done using the following sequence:
\e[0m // Reset colors to their default values
One pixel per glyph
In the first iteration I simply wanted to have one pixel per glyph. This meant I needed to resize the input image so that one pixel corresponds to one glyph, and since the glyphs on a terminal are not square I would also need to adjust for this by changing the aspect ratio of the image. Below you can see the image after it has been resized from its original size of 768x512 in order to fit on a terminal with 106 columns. Besides resizing the image, the colors from the 24bpp source material have mapped into the 256 colors provided by the terminal. So when we want to render this resized and recolored image we simply loop through all the pixels and for each pixel we emit one of the escape codes to change the background color and then print a space. Also at the end of each row we reset the colors to their default values and print a newline.static void print_one_pixel_per_glyph(iRGBAImage *image) { for(int y = 0; y < image->h; y += 1) { for(int x = 0; x < image->w; x += 1) { iRGBA bg = image_color_at(image, x, y); printf("\e[48;5;%dm ", rgb_to_xterm(bg.r, bg.g, bg.b); } printf("\e[0m\n"); } }

Two pixels per glyph
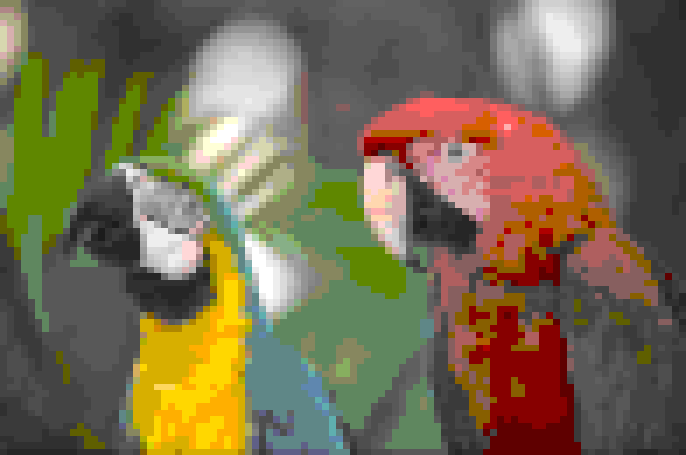
Up to now only the background color of the terminal has been used. In this iteration I will also use the foreground color to display a total of two colors per glyph. In order to neatly subdivide each glyph into two regions we can use unicode Block Elements. The glyph could be divided in two ways, one increases horizontal resolution and the other vertical resolution. Because the glyph is taller than wide we will choose to increase the vertical resolution and get more rectangularly shaped 'pixels'. We will use the 'Upper half block' glyph '▀', so the upper part of the glyph will receive the foreground color and the lower half will receive the background color of the terminal. Now that the subpixels are more rectangular the resized / recolored image below is closer to its original aspect ratio.static void print_two_pixels_per_glyph(iRGBAImage *image) { for(int y = 0; y < image->h; y += 2) { for(int x = 0; x < image->w; x += 1) { iRGBA fg = image_color_at(image, x, y); iRGBA bg = image_color_at(image, x, y+1); printf("\e[48;5;%dm\e[38;5;%dm▀", rgb_to_xterm(fg.r, fg.g, fg.b), rgb_to_xterm(bg.r, bg.g, bg.b)); } printf(\"\e[0m\n"); } }
Four pixels per glyph (still just 2 colors though)
With the previous iteration the tool was basically up to par with the image rendering used in Rainbow Stream, but while implementing it I noticed some of the other unicode block elements such as:▛ // Quadrant upper left, upper right, and lower left ▟ // Quadrant upper right, lower left, and lower right ▙ // Quadrant upper left, lower left, and lower right ▜ // Quadrant upper left, upper right, and lower right ▞ // Quadrant upper right, and lower left ▌ // Left half blockUsing these glyphs I could maybe increase the horizontal resolution as well. We still need to print 106 glyphs per column, but for every glyph four image pixels need to be considered. To choose the glyph we simply do a pattern match on the configuration of the colors in the corresponding 2x2 section. In the case that there are two or less colors this works fine, but in the case that there are more than two colors it is not possible to find a match so we simply do a linear blend of the pixels in the top row of the 2x2 section and the same for the bottom row, and then use the '▀' glyph with the resulting two colors.
static void set_color(int fg_color, int bg_color) {
  printf("\e[38;5;%dm\e[48;5;%dm", fg_color, bg_color);
}

static void print_four_pixels_per_glyph(iRGBAImage *image) {
  for(int y = 0; y < image->h; y += 2) {
    for(int x = 0; x < image->w; x += 2) {
      iRGBA tl = image_color_at(image, x,   y);
      iRGBA tr = image_color_at(image, x+1, y);
      iRGBA bl = image_color_at(image, x,   y+1);
      iRGBA br = image_color_at(image, x+1, y+1);

      int c1 = rgb_to_xterm(tl.r, tl.g, tl.b);
      int c2 = rgb_to_xterm(tr.r, tr.g, tr.b);
      int c3 = rgb_to_xterm(bl.r, bl.g, bl.b);
      int c4 = rgb_to_xterm(br.r, br.g, br.b);

      if(c1 == c2 && c2 == c3 && c1 != c4) {
        set_color(c1, c4);
        printf("▛");
      } else if(c2 == c3 && c3 == c4 && c1 != c2) {
        set_color(c4, c1);
        printf("▟");
      } else if(c3 == c4 && c4 == c1 && c1 != c2) {
        set_color(c1, c2);
        printf("▙");
      } else if(c1 == c2 && c2 == c4 && c1 != c3) {
        set_color(c1, c3);
        printf("▜");
      } else if(c1 == c2 && c3 == c4) {
        set_color(c1, c3);
        printf("▀");
      } else if(c1 == c3 && c2 == c4) {
        set_color(c1, c2);
        printf("▌");
      } else if(c1 == c4 && c2 == c3) {
        set_color(c1, c2);
        printf("▚");
      } else {
        iRGBA top = { (tl.r + tr.r) / 2, (tl.g + tr.g) / 2, (tl.b + tr.b) / 2, 0xff };
        iRGBA btm = { (bl.r + br.r) / 2, (bl.g + br.g) / 2, (bl.b + br.b) / 2, 0xff };
        int top_id = rgb_to_xterm(top.r, top.g, top.b);
        int btm_id = rgb_to_xterm(btm.r, btm.g, btm.b);
        set_color(top_id, btm_id);
        printf("▀");
      }

    }
    printf("\e[0m\n");
  }
}

Dithering?
Another thing I thought that might improve the rendering was to use dithering in order to remove the Color banding . I used Floyd-Steinberg dithering, as you can see in the preview below the color banding seems to have been considerably reduced. However in the expanded image the effect is not as nice. The pixels are no longer small enough to have the same effect, and instead it seems to make the image more noisy. Whether the use of dithering is beneficial in this case may depend on personal preference.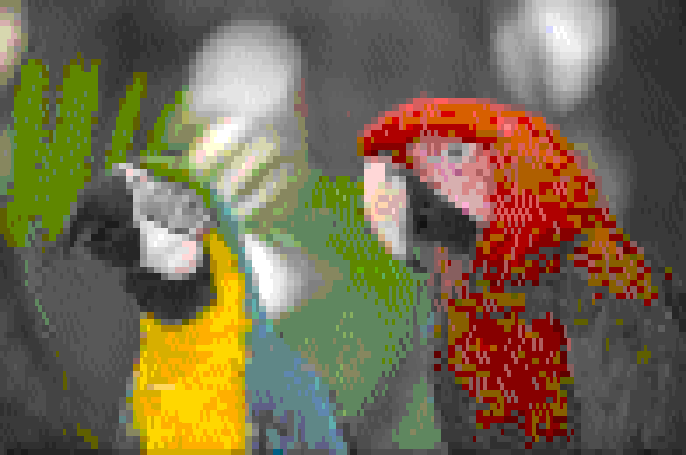
True color support
An alternative solution to the banding problem is to simply use a terminal emulator that supports true color display. In terminals that support it you can use the following escape codes to set the foreground and background colors:\e[38;2;255;255;255m // Change the foreground color to color white \e[48;2;255;255;255m // Change the background color to color white
Implementation
In order to implement this small tool I used stb_image.h for image loading and xterm256.c for color conversion. The test image was downloaded from the Kodak Lossless True Color Image Suite. If you want to try it out for yourself you can download it here: imgpreview.tar.gz. Compilation should hopefully be as simple as running the packaged build.sh script which should result in the imgpreview executable. You can get information about the usage by running it without any arguments.References
[1] Rainbow Stream[2] xterm256.c
[3] Fabulous
[4] ANSI escape codes
[5] Block Elements
[6] Color banding
[7] Floyd-Steinberg dithering
[8] stb_image.h
[9] Kodak Lossless True Color Image Suite